
Panels fail almost never unless you do something stupid to them. Inverters mostly die of old age or a lightning hit. The part that actually burns solar arrays down is the one nobody photographs and everybody underestimates: the little plastic connector on the end of the wire. It’s the cheapest component in the whole system and it’s the one most likely to cook itself, and the reason is almost always the same — somebody mated two things that shouldn’t have been mated, or crimped a contact they didn’t have the right tool for. So here’s what I’ve learned about doing them right, Some of it I learned just this week when I discovered my own connectors weren’t what I thought they were.
“MC4” is a brand, not a standard
Everybody calls these “MC4 connectors” the way everybody calls tissues Kleenex. But MC4 is a specific product from a Swiss company (Stäubli, formerly Multi-Contact — the “MC” in MC4). What’s actually on the market is a whole family of look-alikes: Stäubli’s own MC4 and the newer MC4-Evo 2, Amphenol’s H4, TLian’s T4 and T6, and a dozen no-name clones that copy the shape. They all snap into roughly the same footprint, which is exactly the trap.
I found this out the hard way. I’d planned my whole wiring scheme around generic MC4s, then went to unclip a lead on one of my Canadian Solar panels and none of my MC4 tools fit — the latches sat closer together, the sides weren’t slotted for the release pins, and the gland nut was a size bigger. The connectors said TLian T4. My panels had never shipped with MC4 at all. Which brings us to the only rule that really matters.
The one rule: never cross-mate brands
when you read a post on some forum about how MC4 connectors almost burned down their house, or a connector melted and tripped their inverters arc detection, or just a general post that states MC4 connectors suck toads you can safely assume one thing–they aren’t talking about a true Staubli MC4 connector plugged into another true MC4 connector
Two connectors snapping together is not the same as two connectors being rated to mate. Every one of the real MC4-style connectors are UL-listed only when mated with its own kind — same type, same manufacturer — or with something the maker specifically lists as cross-compatible. The code even says so: NEC 690.33 requires mating connectors to be of the same type and brand, or listed and identified as intermatable. Mix a Stäubli male with an Amphenol female because they physically click, and you’ve built a junction that no lab ever tested, with contact and detent tolerances that don’t quite agree. It reads fine on day one. Then the slightly-loose contact runs a few milliohms hot, the heat relaxes the plastic, the resistance climbs, and eighteen months later you’ve got a brown, brittle connector and a scorch mark. It also voids your PV panel warranty the instant you click it together.
So match every mating pair to one brand. On my array that means a TLian connector meets a TLian connector, full stop. Same-brand cross-series can be fine when the maker says so — TLian, for instance, states its T4 and T6 intermate with each other, so a T6 (the heavier 6 mm² 10AWG version) mating my panels’ T4 is legitimate because the manufacturer put it in writing. That written blessing is the whole difference between “compatible” and “hope.”
10 AWG, 12 AWG, and How to bridge them
Here’s a mismatch almost everyone gets wrong. Panels ship with short pigtails of 12 AWG (4 mm²) wire and a factory-crimped connector. But for your home runs — the long pulls from the array to the inverter — you often want 10 AWG (6 mm²) instead: lower voltage drop over distance, more ampacity headroom, and frankly in my case, because I already have most of two 500 foot reels (one red and one black) of 10 AWG. So now you’ve got 12 AWG leaving the panel and 10 AWG carrying it to the inverter, and they have to meet somewhere.
The wrong ways are the tempting ones: cutting the factory connectors off 32 panels to re-terminate everything in 10 AWG (you’ll never match the factory’s consistency by hand, and you’ll introduce more marginal crimps than you remove marginal matchups), or jamming 10 AWG wire into a contact only sized for 12 AWG (the barrel’s too small, the crimp’s incomplete, and that’s a hot spot waiting to happen). And of course, once again, you invalidate the warranty.
The right way is to let the connector do the transition. The contact inside a PV connector is sized for a wire range, and you simply use the correct contact for whichever wire you’re terminating — a 12 AWG contact on the panel pigtail, a 10 AWG contact on the home run — with both connector bodies the same brand so the mate is legit. Even cleaner: some makers sell a single listed connector rated for both gauges. Amphenol’s H4 Plus, in the #12/10 AWG version, is exactly that — one UL/TÜV-listed connector that covers 12 and 10 AWG, so you can bridge the panel-to-home-run gauge step code-compliantly without cutting a single factory lead. If your panels wear Amphenol H4, that’s the tidy answer; if they wear something else, use that brand’s dual-rated or correctly-sized parts. The principle is the same: transition at the plug, in a connector rated for the wire you put in it, mated only to its own kind.
In my particular case I have a 4 breaker disconnect switch with 8 surge protectors. It’s pre-wired to case mounted, no name “MC4’s” with mating no name MC4 connectors provided for the wiring. I know what you’re thinking–serves you right for buying chinese stuff. That it is, but I have taken these particular four pole brekers apart and carefully examined their guts. They are beautifully designed and well built. Politics and racist stuff aside (yeah, you’re right, I don’t give a shit about that) they are just what I needed for the job. So I bought pre-wired single ended T6 leads that plug into the first and sixteenth connector of my 8-panel series strings. I tested the no-name MC4’s provided with the combiner on 10AWG wire–the connectors appear to be dual size since 10AWG fits perfectly (better than 12 actually–it looks like they copied the 10/12 guts of the Amphenol H4 plus) and crimps nicely, both the conductor crimp and the strain relief in the gland nut. So I have extension leads for the ends of the four strings (32 Canadian Solar CS3W-415PB-AG 415W Bifacial panels) that transition to the correct no-name “mc4s” on the disconnect switch. The home runs from the disconnect switch to the two new EG4 18KPV Hybrid inverters will be four pairs of #10 solar wire in trenched 2″ conduit, connected to the disconnect switch with the matching no-name “MC4″s using 10 AWG wire on those leftover reels.
Crimping it so it lasts twenty years
A PV connection lives or dies on the crimp, and the crimp lives or dies on using the right inner contact parts, the right die, and the right technique. I am a tool freak, so I have the proper crimping tools. Cheap pliers are NOT EVER the proper tools. Unfortunately I also have a home in Maui (there’s a sentence you aren’t likely to read anywhere else) and I have both a small shop and a good sized solar project there. And my memory sucks, so while I always try to have the right tools for any job, the tool I need in Oregon might be in Maui. So if the tool isn’t crazy expensive I’ll order another so I won’t delay the project over a 14 buck crimping tool. The end result is a bit of duplication. When I went looking for my connector crimping tools this is what I found:
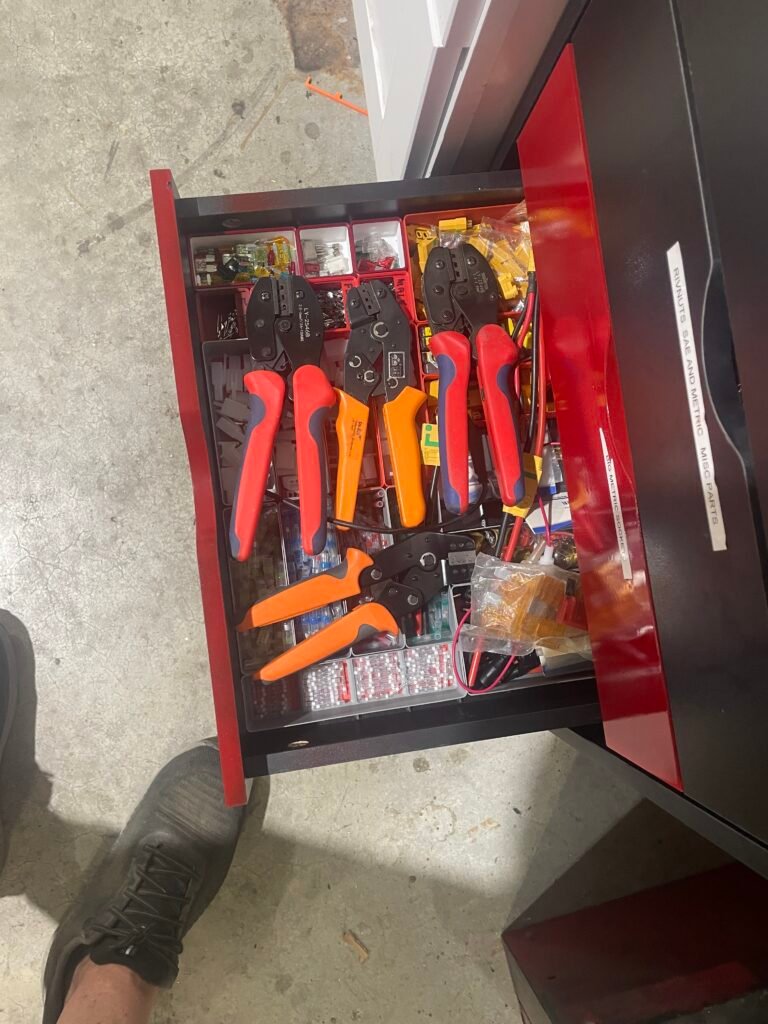
- Match the contact and die to the wire. 10 AWG contact for 10 AWG wire, and the crimp die sized for that contact. The first crimping tool I grabbed only carried dies up to 4 mm² (12 AWG), so it physically could not make a proper 6 mm²/10 AWG crimp. A tool that only does 12 AWG will happily mangle a 10 AWG contact and leave you thinking you’re done. Make sure you have the die sizes you need.
- Get all the copper in, and make it gas-tight. Strip to the connector’s spec so the conductor bottoms out in the barrel, don’t shear off strands to make it fit (if strands don’t fit, you’ve got the wrong contact), and run a full ratcheting crimp so the joint is cold-welded tight, not just pinched.
- If you screw the connection up, don’t try to fudge it. Cut the connector off, throw it away, try again. Make sure you order a few extra connectors. Even the very best ones are cheap compared to the cost of everything else you’re doing. I’m constantly tempted to risk an expensive project to save a cheap part. Don’t do it. After 60+ years of fuck ups saving a nickle and risking a thousand bucks (damn, if it were only a thousand bucks) I’m pretty well cured of that.
- Use the insulation grip of the gland nut. That gland nut insert is strain relief — it keeps cable flex from fatiguing the conductor crimp. On an exposed outdoor run it matters more than the beautiful machined solid inner parts of the best 10 AWG connectors. The wimpier stamped sheet steel 12AWG connectors with a tight fitting gland nut strain relief are just as good in the long term as long as they are made up properly and are matched sets.
- Seat it and tug it. Push the crimped contact into the housing until it clicks (making absolutely sure that the inner contact elements are pushed completely into the housing), then give a firm pull on the wire — it should not back out. A contact that isn’t fully compressed and cold-welded arcs inside the shell, invisibly, until it fails. Don’t bypass this test because you don’t want to pull your freshly made connector apart. If it fails, it wasn’t good, and now you know it was crap to begin with and should not be used. Do it again.
- Snug the gland nut and keep the seal. Use the connector’s spanner (that oversized gland nut is why your MC4 wrench doesn’t fit a T4 or an H4) and torque it enough to compress the weather seal/strain relief. A crimp that lets water in is a crimp on borrowed time.
- There are some very good videos on YouTube that show exactly how to use a crimper to make up an MC4-type connector. There’s only one way to do it right, and you won’t get it right by guessing–it’s a bit counter-intuitive. I might video my own version, but my videos tend to ramble and not be shot or edited very well. I need to get someone to help me with that.
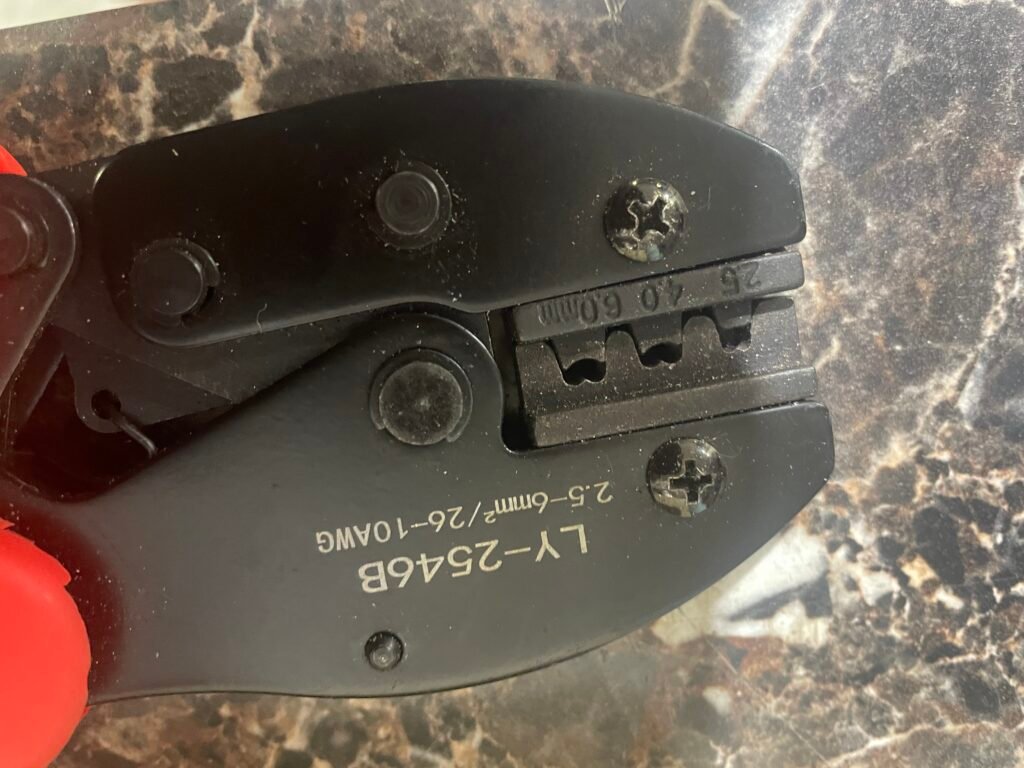
This crimper can handle 10, 12, and 14 AWG
And never, ever, never, never, never crimp these with pliers. A PV connector made with pliers is junk no matter how skilled you think you might be. You’re asking for failure.
Then check your work
Here’s the cheap insurance that catches the one junction that didn’t take even if you did your best: on a sunny, high-output day, walk every connector with an infrared thermometer. I use an infrared tire temperature gauge left over from my car racing days. They should all read about the same. The one running warmer than its neighbors is a bad crimp or a marginal mate, and it’s telling you now — while it’s a five-minute redo — instead of a year from now when it’s a melted connector and a fault you’re chasing in the dark with a flashlight in your teeth.
The connector is the least glamorous, least expensive, most safety-critical part of the whole array. Match the brands, size the contact to the wire, own the right tool, and verify with heat. Do that and the plugs quietly disappear into the background for two decades, which is exactly what you want from them.